How to Clip on Twitch? The clip on Twitch is used for creating the best moments while streaming. If we describe the twitch clip in one sentence means It works the same as the screen recording. Whatever the work going on your screen, record it for later purposes. But the Twitch clip is a little different from the direct screen recording. In Twitch clip, you can share a video clip for up to 30 seconds only. This video is useful to show what’s going on on your new channel or any clips about the future streams. What kind of stream you do. It is helpful for the new followers to understand what type of stream you are doing. And what is the taste of content you share?
A Twitch clip can make by you or your follower. By clipping and sharing the clip, you can increase your audience. It will be helpful for the viewers to understand how good content you are sharing. If your followers are clipping on your stream, you and other new viewers can see them. On the clips tab, you can find the list of clips. The minimum length of a video clip will be 5 seconds and a maximum of 1 minute. If you clip a video from your stream, a link will also generate to see the source video.
How to Clip on Twitch
It’s best to share with your friends and followers what stream on your channel. Not only by you, if your followers like your work, they can also create a clip and share it with their friends. That clips can see by you and other new followers too. You can manage clips on your channel to find the best clips for visitors. Here how you can create clips on the Twitch app:-
Create and share clips with your friends.
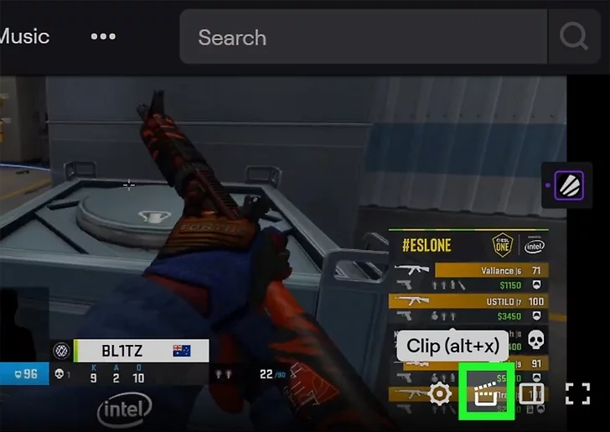
- While streaming, you can find the clip icon on the clip icon on the video or by pressing “ALT+X” on windows and “⌥+X” on Mac.
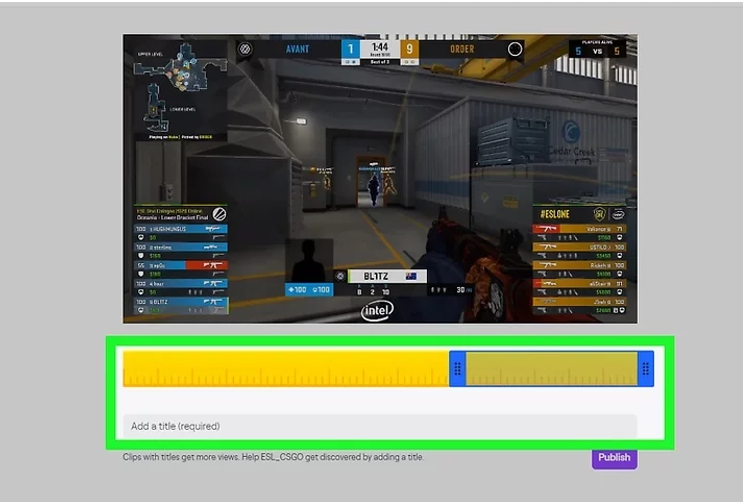
- Once you finished clipping, you can see a slider (for trim) on your screen. Now adjust the slider which one is your best moment, and enter the title to get interested before opening.

- After entering the title and trimming the clip, click on the Publish button to publish your clip. So others can easily watch out.

- If you want to download your clip, click on the Export or Download.
You can also understand it by twitch’s official website from here https://help.twitch.tv/s/article/how-to-use-clips?.
Create and share clips on Android or IOS devices.
If you are using a smartphone to stream your videos on the Twitch app, you can clip your best moments while streaming. Whenever we stream a video, we can find some best, funny, and adorable moments in the video. To watch it later, we usually use to clip them on our device. So it would be easy to experience those moments again. Here how you can create and share a clip on mobile devices:-
-
For Android:-
- Open a streaming video.
- Now tap on the on-screen video to open hidden options.
- Now tap on the Create Clip button from the given choices.
- It will start clipping your video. Once it’s finished, it will grant you options to share the clip via direct link, social media, or Twitch Whisper.
-
For IOS:-
- Open a stream, past broadcast, or highlights.
- Tap on the screen to open hidden options for video.
- Now tap on the Share
- Now tap Create Clip at the bottom of the share options.
- It will start clipping your video. Once it’s finished, it will give you choices to share the clip via direct link, social media, or Twitch Whisper.
Also, try one useful feature of twitch What is a twitch raid and How to raid on twitch.
Find and Filter clips. ( How to Clip on Twitch )
To view the best clips of a popular channel, you can find them on the video tab. It is helpful to find your best content from a channel. It is the most appropriate way to find the channel’s best videos. Here how to filter and find clips from a streamer’s community:-
- To view the channel’s best clip, navigate to the channels video tab. If it is streaming, go to the profile picture of the community to access the menu.
- Now select the “Filter by” dropdown menu and select clips in the dropdown menu.
- It will filter the most viewed clips from the past 24 hours, week, month, and all the time using the Top dropdown menu.
- If you want to view all the snip for a cocksure category, click the Browse button at the top of the site. Now select your desired category or, you can also use the search bar to search for and navigate to your chosen category directly. Now click the Clips in the top-left corner.
How do I remove clips of my twitch channel?

Go to the URL of the clip you’d like to delete and click on the Gear icon to open settings. Now select Moderation. You can choose either Delete the individual clip or Delete all clips from the video will remove every clip. If you want, you can also delete clips from your Clips page.
To delete multiple clips from the Clips page, check on the checkbox right to each snip. Now two buttons will appear at the top of the table: “Delete Selected” and “Delete all Clips of my Channel.” These options will permanently delete all clips. Before proceeding, please think twice.
Discord is the best alternative to twitch for gaming and saving clips How to Use Discord on Xbox? Linking & Unlinking after Playing Game.
Frequently asked questions on How to Clip on Twitch
Question: Do clips ever expire?
Answer: No, clips never expire automatically. Just like highlights, they keep in your account. The creator can choose to delete their original clip at any time.
Question: Where can I find all the clips created of my channel?
Answer: You can find them on the clips of my channel under the Clips page. You can search, filter, and manage them from the Clips page.
Question: What can I do if a user is abusing clips?
Answer: It happens when a new viewer visits our channel. You can provide specific users a 24 hours timeout from creating clips from your community. You can also permanently ban them from creating clips of your group. To do this, hover the mouse on the player and click on the Settings or Gear icon. Or you can find it on the three vertical dots(⋮) icon. Once you timeout or ban a user, it will also timeout and ban these users from participating in the chat on your channel.
Question: Why am I receiving a “Clips are disabled for this channel” error when trying to create a clip?
Answer: This cause can happen if a creator has chosen to disable clip creation on their channel. You cannot use the create clip functionality on his channel. You can face this issue if a creator sets his preference to allow only Followers or Subscribers to create clips of their channel, and you are not a follower or Subscriber.
